1. How to Create a Hunt
Table of Contents
This is a guide describing how to set up a new puzzlehunt on the Puzzle Hunt CMU server. This guide assumes that the server itself is already set up and that you already have an account on the server with both “Staff” and “Superuser” permissions.
1.1. Prepare the Hunt Content
Before anything is done on the server you should decide on some basic details about the hunt. You can always come back and edit these details later if they change. Some things to think about:
- Hunt Name
- Hunt Date
- Hunt duration
- Hunt starting location
- Max team size
- Number of puzzles in the hunt
- Unlocking structure for the puzzles in the hunt
Those first 5 details are especially important because they will be visible on the front page as soon as you establish this hunt as the current hunt.
1.2. Create the Hunt Object
You aren’t going to get very far without a hunt object to attach all of this
data to, so sign in with your staff account and navigate over to
{server URL}/staff. You should be greeted with a page like the one below:

Click on the “Hunts” label either in the center or on the left-hand sidebar.
Once on the hunts page, click the blue “+” button in the upper right-hand corner to create a new hunt object. The page should now look like the below image:
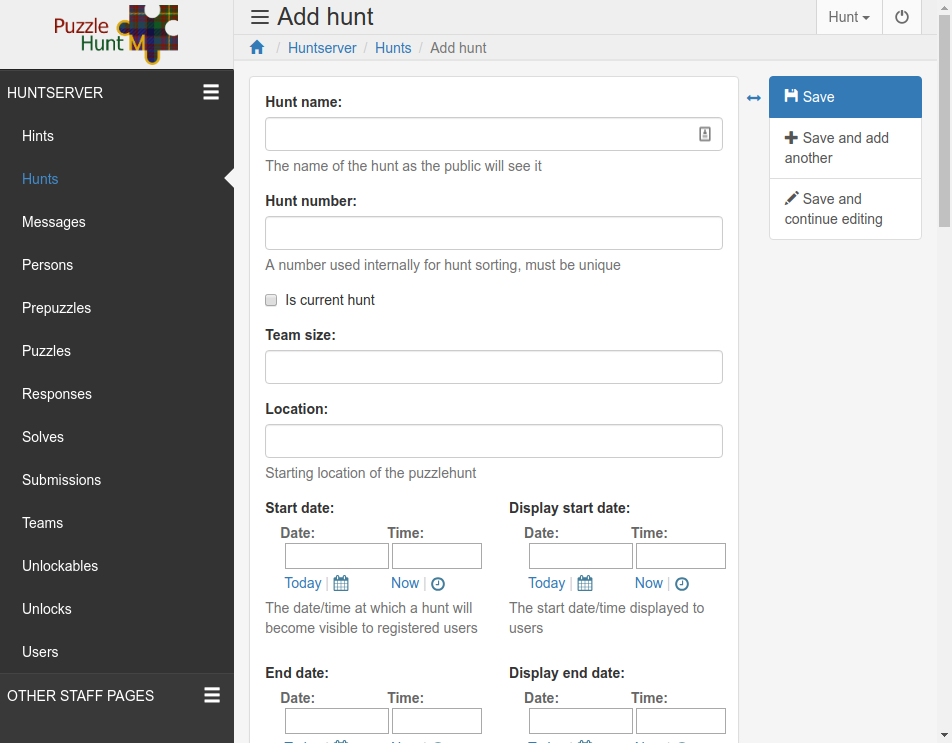
Start by filling out everything in the “Basic Info” section.
Caution
Checking the “Is current hunt” box will make this hunt the hunt visible on the front page of the website. Only do so if all of the public facing details (everything in the “Basic Info” section) are correct.
Important
There are two start and end dates.
“Start Date” and “End date” are for internal use and will control things like when the puzzles become available to the players, when teams start gaining points for point based hunts, and when the hunt will automatically stop accepting answers.
“Display start date” and “Display end date” are the dates/times displayed on the front page of the website and control nothing.
In general, set the display dates for when people should arrive and leave and set the actual dates for when teams should be actively solving puzzles.
Next, fill in the two fields in the “Hunt Behavior” section, the help texts should be pretty self explanatory.
The next section covers the “Resources/Template” section. If you don’t want to deal with making the hunt template right now just type anything you want in the template field and then skip to “Hint Unlock Plans” below.
1.2.1. Editing the Hunt Template
This is where we give the hunt its look and feel. Before this point, navigating to the hunt page would just give you a blank page.
1.2.1.1. Basic Information
Everything typed into the “Template” form on the hunt editing page will be run through Django’s templating engine and rendered as HTML on the hunt main page.
You can find documentation about Django’s template language here: https://docs.djangoproject.com/en/2.2/ref/templates/language/. I’d recommend reading the “Variables”, “Filters”, and “Tags” sections.
Speaking of variables, the following variables will be passed to the renderer for use in the template:
| hunt: | The current hunt object |
|---|---|
| team: | The team object for the team of the user currently visiting the page |
| puzzles: | A list of puzzle objects that the team currently has unlocked, sorted by puzzle number |
| solved: | A list of puzzle objects that the team currently has solved, unsorted |
Tip
You can view the fields that are available to access on each of the team, hunt and puzzle objects in the models documentation.
Since version 3.0, in order to reduce repository clutter, it is now against policy to commit files specific to a certain hunt to the repository. This means that you are no longer allowed to load resource files directly onto the server.
To still allow the use of new static files in each hunt, there is now a field on each hunt’s admin page for a resource URL. This URL should point to a publicly accessible zip file, which contains all static media needed for the main hunt page. The resources can be downloaded by clicking the “Resources” button next to the appropriate hunt on the Hunt Management page. After the resources have been downloaded, they will be accessible through the use of a special template tag.
The {% hunt static %} template tag will insert the URL to the current hunt’s
resource directory. For example, putting the text
{% hunt static %}myimage.png in the template would insert the URL to the
file myimage.png.
1.2.1.2. Inheriting the Base Template
It is recommended to start your template out with the following code:
{% extends "hunt_base.html" %}

{% block content %}
  Your content here
{% endblock content %}
The above code inherits the hunt_base.html template, which in turns inherits the base.html template. You don’t need to know the contents of those two files, just that they provide the basic functionality like the site header and they define the following blocks that you can override for additional custom behavior:
- {% block title %}
- This block controls what title is in the web browser tab. The default value for this block is “Puzzlehunt!”
- {% block base_includes %}
- This block controls what content will be sourced/included before the standard Bootstrap and Jquery imports. This allows you to override unwanted bootstrap styles. The default value for this block only imports hunt_base.css.
- {% block includes %}
- This block controls what content will be sourced/included after the standard Bootstrap and Jquery imports. This is for content that you want to use to extend those libraries, or content that relies on those libraries.
- {% block footer %}
- This block controls what content will be inserted at the bottom of the page. The default value is links to our social media and bridge page.
You can read more about Django template inheritance and blocks here: https://docs.djangoproject.com/en/2.2/ref/templates/language/#template-inheritance
Warning
While you may use completely custom HTML, it is STRONGLY RECOMMENDED that you follow the instructions below on how to inherit the base template to get nice features like the header bar, common style sheets, Google analytics, and graceful degradation when the hunt becomes public.
1.2.1.3. Starter Example
While you may now technically have all of the information you need, that doesn’t mean you know what to do with it. Below is a simple example based one of our first hunts to use this server. It will show the puzzles, display the answer for any solved puzzles, and demonstrates how to break a hunt into two rounds.
{% extends "hunt_base.html" %}
{% block title %}Puzzles!{% endblock title %}

{% block base_includes %}
<link rel="stylesheet" type="text/css" href="{{ STATIC_URL }}huntserver/hunt_base.css">
<style>
.puzzle-name {
  white-space: nowrap;
  overflow: hidden;
  width: 320px;
}
</style>
{% endblock base_includes %}

{% block content %}
<div class="container" >
  <div class="row" >
    <div class="content col-md-6 col-md-offset-3" id='puzzle-frame'>
      <h1 class="title">Puzzlehunt: The Musical</h1>
      <div id="puzzles">
        <table>
          <thead>
            <tr>
              <th style='width: 320px'>Puzzle Name</th>
              <th style='width: 180px'>Solution?</th>
            </tr>
          </thead>
          <tbody>
            {% for puzzle in puzzles %}
              {% if puzzle.puzzle_number == 8 %}
                </tbody>
                </table>
                <h3 class="title">- Intermission -</h3>
                <table>
                  <tbody>
                  <col width="320px">
                  <col width="180px">
              {% endif %}
              <tr id='puzzle{{ puzzle.puzzle_number }}' class='puzzle'>
                <td>
                  <p class="puzzle-name">
                    <a href='/puzzle/{{ puzzle.puzzle_id }}/'>
                      {{puzzle.puzzle_name}}
                    </a>
                  </p>
                </td>
                <td>
                  {% if puzzle in solved %}
                    {{ puzzle.answer|upper }}
                  {% endif %}
                </td>
              </tr>
            {% endfor %}
          </tbody>
        </table>
      </div>
      <p> Feeling stuck? <a href="/chat/">Chat</a> with us</p>
    </div>
  </div>
</div>
{% endblock content %}
1.2.1.4. Template Wrap Up
That should be enough to get you started with template writing. Don’t forget to download resources each time you update them and save often when editing the template as it won’t save if you close or leave the page for any reason.
Tip
You can use ctrl-s/cmd-s to save the page and continue working
1.2.2. Hint Unlock Plans
The final section of the Hunt creation page is for determining if and when hints will automatically become available to teams. If you do not want to use automatic hints (or hints at all) in the current hunt, simply ignore this section. Manual hints can still be awarded from the “Hints” page under the “Other Staff Pages” sidebar header.
If you do want to automatically award hints during the hunt, there are three possible unlock mechanisms for hints:
- Exact Time Unlock:
- All teams will gain a single hint some amount of time into the hunt. Use the unlock parameter field to indicate how many minutes into the hunt this hint should be given out.
- Interval Based Unlock:
- All teams will gain a hint every X minutes for the entire duration of the hunt. Use the unlock parameter field to indicate the number of minutes between hints. The first hint will be given out X minutes after the start of the hunt.
- Solves Based Unlock:
- Each team will individually be given a hint when they reach a certain number of puzzle solves. Use the unlock parameter field to indicate how many solves a team needs to unlock this hint.
You may add as many hint unlock plans as you want, using the “Add another Hint unlock plan” link at the bottom to add additional rows to the table. All hint plans will trigger independently of each other.
Caution
“Exact Time Unlock” and “Interval Based Unlock” hints are both calculated against the “Start Date” field of the hunt, making it even more important that the start date is actually when teams will start solving puzzles and not just when teams arrive for check in.
Danger
Changing a hint unlock plan after the hunt has started can have unexpected results. Please take extra care to make sure that the hint plans are correct before the hunt starts.
1.2.3. Hunt object creation wrap up
After you’ve filled in everything make sure “Is current hunt” box is appropriately checked or unchecked and hit the blue “Save” button in the upper right.
1.3. Create Puzzle Objects
Great, now we have a hunt template and we can view our hunt, but that’s not good without any puzzles, so let’s add some.
Start by going to the “Puzzles” section using the side navbar and clicking the blue “+” button in the upper right-hand corner to be brought to the puzzle creation page.
1.3.1. The Basics
Start by choosing which hunt the puzzle will belong to and giving the puzzle a name and an answer.
Tip
Answers are not case sensitive
Next, the puzzle must be given both a number and an ID. The number is for ordering within the hunt, and controls the order of puzzle objects passed into the hunt template. The ID used as a unique identifier across all puzzles is used in the URL for the puzzle.
Note
The current trend for ID’s is to have the same 3 digit prefix for all puzzles in a hunt and to use the puzzle’s number as the last 2 digits. This allows easy visual grouping of puzzles by hunt, and an ordering over all puzzles.
1.3.2. Attributes
Next are three True/False puzzle properties, all of which default to False:
- “Is a metapuzzle”
- Controls which puzzles are marked as metapuzzles for the purpose of scoring on the progress page.
- “Doesn’t Count”
- Controls whether or not the puzzle is discounted from scoring on the progress page.
- “Is HTML puzzle”
- Controls whether the puzzle is more than just a PDF. If this box is checked, the puzzle page will not display a PDF, and instead display a link to the HTML content from the “Resource link” discussed below.
1.3.3. Content
Puzzle content is controlled by the following three links:
- “Link”
- The link to a publicly accessible PDF of the puzzle (if the puzzle is not an HTML puzzle).
- “Resource link”
- The link to a publicly accessible ZIP file of the puzzle contents if the puzzle is an HTML puzzle. The ZIP file must contain a file named “index.html”. All links from the index file to other files in the ZIP file should be relative links, as the base URL of the final contents is not guaranteed.
- “Solution link”
- The link to a publicly accessible PDF of the puzzle solution. If this field is filled in, the solutions for each puzzle will be available on the puzzle page after the hunt is over.
Tip
Linking an unzipped Dropbox folder for the resource link will also work. Dropbox will automatically generate a zip file of the folder upon download.
1.3.4. Unlocking the Puzzle
Next is the matter of how the puzzle is unlocked. As of version 4.0, there are now four options for puzzle unlocking:
- Solves Based Unlock:
- The puzzle will be unlocked once a certain number of puzzles from a chosen subset are solved. Use the puzzle chooser to indicate which puzzles count towards unlocking this puzzle. Then enter the number of puzzles required to unlock this puzzle in the “Num required to unlock” field. Setting the number of required puzzles to zero means that this puzzle will automatically be unlocked when the hunt starts.
- Points Based Unlock:
- The puzzle will be unlocked once a team has earned enough points. Use the “Points cost” field to specify how many points a team needs to unlock this puzzle and the “Points value” to specify how many points solving this puzzle gives a team. Points will also be given according to the rate specified by the “Points per minute” field in the hunt object. Setting the “Points cost” field to zero means that this puzzle will automatically be unlocked when the hunt starts.
- Either (OR) Unlocking:
- Fill out both of the above field pairs and the puzzle will be unlocked when either unlocking method’s criteria is met.
- Both (AND) Unlocking:
- Fill out both of the above field pairs and the puzzle will be unlocked when both unlocking method’s criteria are met.
1.3.5. Auto-Response Objects
At the moment, whenever a user submits a correct answer, the server will respond with “Correct!” and whenever the user submits a wrong answer the server will respond with “Wrong Answer”. Often you will want additional customized responses that can do things like tell the user how they are wrong or to tell them to “Keep going!”.
To create automatic responses, use the “Responses” section at the bottom of the puzzle creation form. The “Regex” field is a python-style regex checked against the answer and the “Text” field is the text that will be returned to the team. The regexes are not applied in any specific order, so answers that match more than one regex will result in undefined behavior.
Tip
Response text can contain links using markdown style format: [foo](https://link.to.foo)
1.3.6. Puzzle Wrapup
After filling out everything on the puzzle creation page, hit “Save and add another” and continue to add puzzles until you have added all of the puzzles for the hunt. This will take a while; my recommendations are to be patient and have the unlocking graph on hand.
1.4. Create Prepuzzle Objects
As of version 3.3, the server now supports prepuzzles. A prepuzzle is a simpler puzzle that exists outside of the normal set of puzzles for a hunt. Prepuzzles are different in a number of ways:
- Prepuzzles do not require users to sign in
- Once published, prepuzzles are accessible before the hunt is open
- Prepuzzle submissions only support auto-response and do not show up on the queue page
- Prepuzzles can be, but do not need to be tied to any specific hunt.
Like other above objects, to create a prepuzzle object, navigate to the prepuzzle section of the admin pages and click the blue “+” icon in the upper right.
Below is a quick summary of the fields, most of them are similar to other fields above:
- Puzzle name:
- The name the puzzle is given and shown to users
- Released:
- Controls whether or not non-staff members can see the puzzle
- Hunt:
- Select which hunt this prepuzzle is associated with, leave blank to not associate it with any hunt.
- Answer:
- The answer to the puzzle, not case sensitive.
- Template:
- See the “Prepuzzle Templating” section below
- Resource link:
- Allows the optional inclusion of static files for the prepuzzle, must be a link to a publicly accessible ZIP file. See the “Prepuzzle Templating” section for details on how to reference the files.
- Response string:
- The string that the server sends back to the prepuzzle page when the puzzle is solved. In the simple example, this string is just displayed to the user, but more complex templates could do anything they desire with this string.
- Puzzle URL:
- This isn’t really a field but rather an easy way to copy out the prepuzzle URL because it isn’t currently accessible from anywhere on the site.
1.4.1. Prepuzzle Templating
As with the hunt “Template” field, everything typed into the “Template” form on the prepuzzle editing page will be run through Django’s templating engine and rendered as HTML.
Again, more information about Django’s templating language is available here: https://docs.djangoproject.com/en/2.2/ref/templates/language/.
Unlike the hunt template, the only variable that is passed to this template is a variable named “puzzle” containing the current prepuzzle object.
Just like the hunt template, it is recommended to use the below code to extend a
basic template, in this case the template name is prepuzzle.html.
{% extends "prepuzzle.html" %}

{% block content %}
  Your content here
{% endblock content %}
The following blocks are available to override in the prepuzzle template:
- {% block title %}
- This block controls what title is in the web browser tab. The default value for this block is the puzzle name.
- {% block base_includes %}
- This block controls what content will be sourced/included before the standard
Bootstrap and Jquery imports. This block contains the navbar formatting and
the javascript helper functions discussed below, so it is not recommended to
override this block without making a call to
{{ block.super }}inside to include the existing contents. - {% block includes %}
- This block controls what content will be sourced/included after the standard Bootstrap and Jquery imports. This is for content that you want to use to extend those libraries, or content that relies on those libraries.
The prepuzzle template has some other special functionality added:
- {% prepuzzle_static %}
- The
{% prepuzzle_static %}tag allows access to the files from the prepuzzle’s resource URL. It works just like the “hunt_static” tag. - check_answer(callback, answer)
- The prepuzzle base template supplies a function called
check_answerthat will deal with all of the server communication needed for answer checking. The function takes a callback function and the user’s answer. The answer is then submitted to the server, and the the response from the server is then passed to the given callback function. The server response is a dictionary in the following form:{is_correct: True, response: "response string"}, whereis_correctis a boolean indicating whether the answer matches the prepuzzle’s answer andresponseis just a string that is either empty if the response was not correct, or the prepuzzle’s given response string if the answer was correct. - {% include “prepuzzle_answerbox.html” %}
- If you use this include statement it will insert a no-hassle answer submission box that includes a spot for users to enter their answer, a submission button and will display the prepuzzle’s response text if the answer was correct.
Warning
Just like the hunt template, you may use completely custom HTML if you want, but it is STRONGLY RECOMMENDED that you follow the instructions below on how to inherit the base template to get nice features like the header bar, common style sheets, Google analytics, and javascript helper funcions.
1.5. Hunt Creation Wrapup
If you’ve been following along, you should now have created everything needed to run a puzzlehunt. Head over to section 2: How to Run a Hunt for specific information on how to use the other parts of the staff site.